Kenmore 1755 Sewing Machine Fix Twin Needle Embroidery Troubleshooting
 |
| Kenmore 1755 sewing machine with the embroidery stitches I sewed on it this morning, after it was cleaned, fixed, and functional. I used Kenmore type C cams I already had. The 1755 sews straight stitch, zigzag, multi stitch zigzag (mending stitch), and blind hem, you need cams to do the other stitches. With the correct needle plate insert, and the bobbin insert, it also sews a chainstitch! |
1755 is one of my TOP FAVORITE SEWING MACHINES!! Smooth, quiet, simple mechanics, easy to maintain, easy to use!
1.2 amp motor
Dual belt pulley system- BUT some early 158.17550 models have a single belt system, I recently acquired one made in March of 1971, with a single belt system, but it is just as fabulous! (Hmm, could it be easier to TREADLE? I LOVE treadling, and want to treadle a good zigzag machine...) Searspartsdirect.com diagrams show this model as dual bt with a self adjusting pulley between them, but be aware, there are points during manufacturing, where a company changes some features.
Heavy duty pulley
Cast iron body
All metal mechanics (except belt, light, possibly the knobs, insulation on wiring)
Center homing needle
Low shank feet
Easy to find walking foot & ruffler!
Reversible zigzag / straight stitch needleplate insert
Chainstitch capable
Twin needle capable
Blind hem, Zigzag, and MULTI STITCH ZIGZAG are BUILT IN!
Kenmore C cams easy to find!
Built in multi stitch zigzag (mending stitch), zigzag, blind hem,
Flat metal buttonholer all metal parts cams
I recently purchased a Kenmore 1755 (158.17550), which the owner said would no longer "feed the fabric". She wanted the $20 she had paid for it, in it's desk, with just a pedal and cord. We didn't test it, just loaded it up, and when we got home, I spent time cleaning and oiling it. This next photo shows why it didn't work- she had the bobbin hook assembled incorrectly, it couldn't work like this, lol!
 |
| THIS IS NOT THE CORRECT WAY TO ASSEMBLE A BOBBIN, it is the reason this machine did not work for the seller. It was also FILTHY, had clearly not been used, or cared for, for many years, but these all metal vintage Kenmore sewing machines are absolutely worth cleaning up and fixing, and SEWING WITH! As you can see by my embroidery samples I stitched on it this morning! I used twin needle for some stitches, single needle for others. |
The only reason it wouldn't advance fabric, was the bobbin hook had been put in wrong, and the black latches had been flipped backwards, so it wasn't secured properly, and the bobbin case was installed sideways, so the needle couldn't go down, all the way, so of course fabric couldn't feed!
Stretch stitch regulator/modifier cleanup information on 1753 (slightly different stretch stitch regulator mechanism from 1755, but nearly identical, otherwise), the knob sometimes needs the grub screw loosened,so you can pull the knob off, to allow you to clean (qtips in rubbing alcohol, use to clean old sticky oil off everywhere 2 metal parts are supposed to move against each other) and oil both inside, and outside the machine, where therod goes through the wall of the machine.
The pivot points of the parts inside the back wall of the 1755, where the stitch selector goes through, need cleaned and oiled well, too. Once the rod can turn (many are frozen up with dry oil), put your knob back on, and tighten the grub screw. Unfortunately, I can't remember if the 1755 rod has the flat spot, for the grub screw to be positioned, but if it does, make sure the grub/set screw get tightened, while the end of the grub screw, is against the flat spot, for the stitch modifier to work correctly.
TWIN NEEDLE EMBROIDERY VIDEO WITH CAMS KENMORE 1755
The machine was extremely dirty, as well, and had none of the accessories, but I happen to have extra cams and accessories, including a manual which is very close to the original. (1753, they look alike on the outside, but have a couple of differences in the mechanisms inside. I suspect they had slightly different cam and accessory sets, as well, they both sew a chainstitch, if you have the adapter, and take type C cams.)
VIDEO
Twin needle Embroidery Sunbursts orange and golden yellow thread Kenmore 1755 Machine Settings
I managed to clean it up and have it sewing with just several hours of cleaning, with Qtips dipped in rubbing alcohol ( sometimes a paintbrush, to reach deeper), then I oiled with TriFlow oil. While it all freed up the first time, after setting for several days, the reverse stretch stitch mechanism, would sometimes stick, regardless of cleaning and oiling.
I wanted to go ahead and sew the embroidery for my dresses, on it, so I kept the oil and a blow dryer next to the machine, while I was sewing. I set it up for stitching, sewed test stitches on a sample of fabric, made any adjustments necessary, and if the mechanism was sticking, I heated it up a minute or so (seriously, 60 seconds is often enough with my blow dryer), oiled the sticking mechanisms, hoping it would fix it, test stitch again, if it worked, sewed on my projects, which are yokes for muumuu dresses, also known as "Float Dresses", especially when sellers want to charge $400 or more per dress!
 |
| ALWAYS SEW TEST SAMPLE STITCHES ON SCRAP FABRIC BEFORE SEWING ON YOUR PROJECT FABRIC, only when stitch samples are perfect, should you sew on your project. |
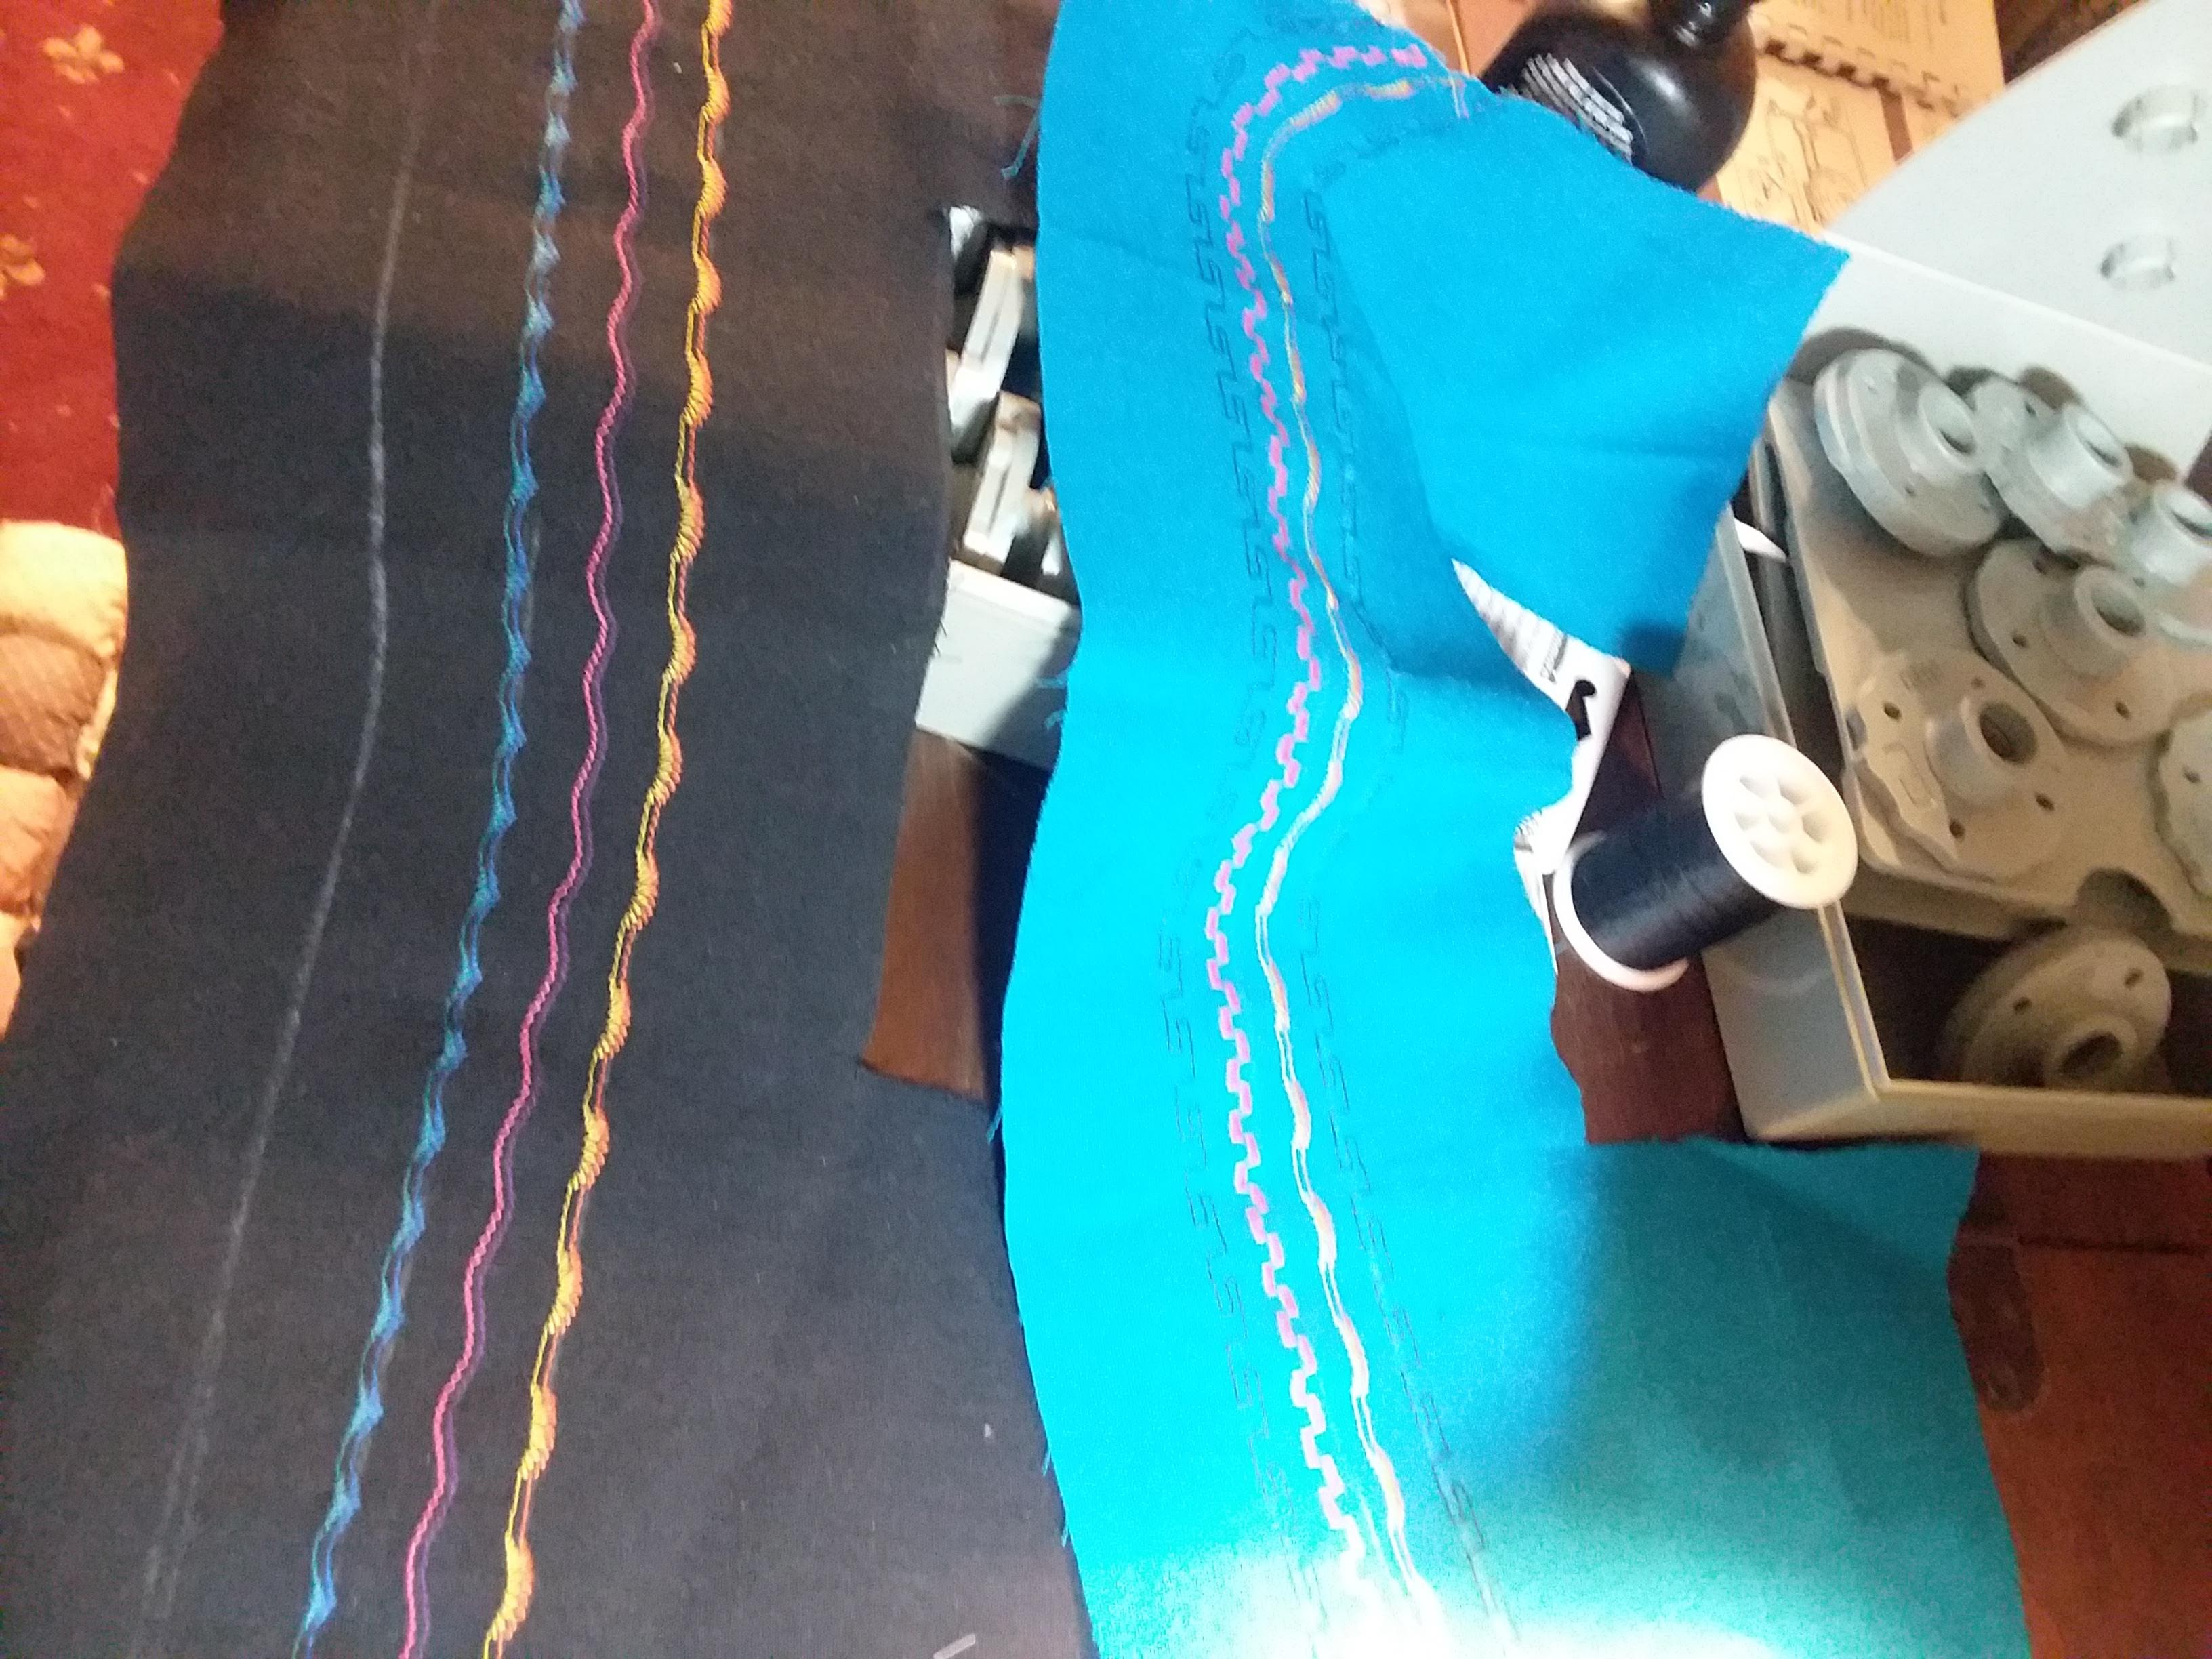 |
| Some of the stitches make you think you are seeing double, but it is literally twin needle stitching, the orange and bright yellow is a sunburst, purple and hot pink, the twin serpentine below it, twin 2 shades of blue mountains, below that, then a chalk line, where I later put hot pink, and then twin needle turquoise and purple, if I remember right. |


 |
| Chainstitch attachments installed, brown needleplate insert for chainstitch, and the silver propeller looking bobbin insert come in the gold plastic case, with clear cover. |
 |
| This is the cup full of dirty Qtips and paper towels I used cleaning up this Kenmore 1755. It takes time, but you are rewarded with an EXCELLENT, heavy duty home sewing machine, which you can sew most things you want to sew, with! |
 |
| Kenmore top simply snaps off, by lifting, it, after you open the noseplate, also called a faceplate, on the left, which covers the needlebar and light bulb area. Toothbrushes make excellent cleaners for feed dogs, and grooves. Shop paper towels stand up better to heavy duty cleaning, than most paper towels, except the expensive ones. |
 |
| Kenmore 1755 Sewing Machine underside and top, which has been removed. |
FROZEN FEED DOG QUICK RELEASE VIDEO TIP
 |
| The nomenclature plate 158.17550 Note the motor is easily accessible. DO OIL THE MOTOR, there are 2 oil ports, one at each end of the motor, usually painted red. There is also sometimes a sticker on the motor, which tells you how many drops of sewing machine oil to place in this port, and how often. There is a wick inside the ends of these motors, which absorbs and holds the oil, lubricating the motor for a longer term, than would otherwise be possible, without more frequent servicing. |
Frozen feed dog drop lever repair 1753 1755
 |
| 12mm is the correct size of ratchet to loosen and remove the Kenmore motor mount bolt, so you can remove the belt from the motor, and access the motor brushes, as well as clean the motor exterior, and access the oiling points hidden above and behind it, inside the mechanics of the machine. |
 |
| Someone has used this machine quite a bit, but not serviced the motor recently. The black dust, is actually powder created by wear on the carbon motor brushes. You can vacuum this off, or wipe it off. I definitely needed to check the motor brushes, to ensure they were still big enough to use safely, and since the motor had a squeal, I knew it probably had a bit of grit stuck under one of the motor brushes, which needed cleaned out. |
 |
| With the motor freed from it's mount, the wires are still connected, and since this is in a table, I didn't want the motor hanging from the wires, so I held it with one hand, while I worked. I removed the motor brushes one at a time (there are two), one on each side of the motor.The little black cap can be unscrewed with a coin, or a flathead screwdriver. They are only about 1/4" tall, do NOT let them just fly off, the spring on the motor brush WILL go flying, taking the carbon brush with it, if you don't hold a hand over the brush cap, as you unscrew it. It will literally push itself into your hand, if you are careful. These brushes still have plenty of good wear left, so I tapped out the grit, and replaced the motor brushes, the black carbon brush goes down in first, there is a curved edge, where it has worn against the round commutator, so you need to put them back in so that that curve matches the shape of the commutator, the same way it came out, for best results, you just screw the cap back down, to hold them in place. Always check both motor brushes, waiting too long to change motor brushes, will often require you to either have a motor rebuilt, or buy a new replacement motor. These vintage ones are often 1.2 amps, which are relatively hard to find, and expensive, when you are looking for a good replacement motor, so take good care of them. For most home sewers, motor brushes will last a lifetime, but if you sew a LOT, you need to check them regularly. If you sew 8 or more hours a day, you should check them every 3 months. After the motor was cleaned and brushes replaced in their little tubes, I reinstalled the belt and put the motor back on the motor mount, using the 12 mm socket and ratchet, making sure to have proper tension on the belt, not too tight, or it stresses the motor, wearing it out faster. Not too loose, or you won't have enough power to sew with. TIP- WHILE THE MOTOR IS OFF THE MOTORMOUNT, IS THE BEST TIME TO OIL THE OILING POINTS HIDDEN ABOVE AND BEHIND THE MOTOR! |
 |
| This machine was pretty filthy inside, but someone did obviously sew a lot, and oiled it heavily enough that it was covered with thick dark brown stickiness, which I had to clean. The needle nose pliers are holding onto an oil soaked thread, which was wrapped tightly around the takeup lever pivot point, so much, it was pushing the bushing off, by at least 1/16"! |
 |
| This dark sticky stuff is literally just dried sewing machine oil (or whatever type of oil was used, by the former owner, prior to the seller, who sold it to me. She said she had it 2 months before selling it to me.) There was thick dark brown and black grease on the gear underneath the camstack, as well. I used a Qtip dipped in rubbing alcohol to hold against the end of the gear where I could reach, then turned the handwheel, to allow the Qtip to clean it off. It took several Qtips! I replaced it with Super Lube. |
 |
| Another view of the oil soaked thread wrapped around the takeup lever pivot point. |
 |
| I was finally able to free all the thread from the takeup lever pivot point, but it took a lot of Qtips dipped in rubbing alcohol to clean this dirty machine up. At least the old sticky oil, thread, and lint, showed that at some point, this machine did a LOT of sewing! Removing the lightbulb, allowed me access to clean that nasty brown oil and lint, inside the faceplate needlebar area. |
 |
| With the oily thread removed, and this area cleaned and oiled properly, it allowed the pivoting bushing on the takeup lever, to be moved back where it should be. |
 |
| Basic cleaning and servicing tools and products. I prefer to use bits which actually fit the screws, to avoid damage to them. You may need a few longer screwdrivers, I also use a Z shaped screwdriver with a flat tip and a Phillips tip, because it has great leverage, and fits places other screwdrivers don't. I switched my clean Qtips to the small plastic container by the Super Lube, and now use the disposable cup, as my dirty Qtip contianer, while I'm working on cleaning sewing machines |
1753 TOP VIEW mechanical
 | ||
Kenmore 1753 Top View to compare mechanical parts to the 1755, in photos below. Both of these models have issues with the reverse for stretch stitches, sticking again, even when completely cleaned and freed up, and oiled, multiple times. This one seems to have slightly simpler mechanisms, for the cam follower and stretch stitch reverse mechanism. Note the long spring at the front left in the 1753, above, the 1755, below, does not have a spring there, it has 2 beefier springs in that network of extra parts, attached to the deck under the stitch cam. 1755 TOP VIEW MECHANICAL
|

 |
| Kenmore 1755 cleaner! Compare the mechanical parts for the zigzag stretch mechanism, to the 1753, in the 2ND PHOTO ABOVE THIS ONE, these models appear identical on the outside, they sew exactly the same built in stitches, but the zigzag stretch mechanism on the 1755 appears to be more "beefy", it has extra parts to supposedly make it work better. It is ironic that these two nearly identical models, have the same sticking issue, in the reverse stretch stitch mechanism, despite these changes, which I believe were meant to help the rebound on the zigzag stretch stitches, be stronger, lol! (Keep oiled & used regularly, or use the hair dryer trick I mentioned at the top of this article, to unstick the mechanism, and get it working, sew stitch samples on scraps before sewing your project, for best results.) |
 |
| Stitch SAMPLES on a scrap of fabric, at least 2 layers thick, or one layer of fabric, with interfacing or stabilizer, BEFORE stitching that stitch on your project, to save a lot of tears, cussing, and frustration. For Twin needle sewing, you cannot use a stitch width wider than 1/2 the maximum zigzag stitch width, to avoid breaking your needle, and knocking your machine out of time. |

STANDARD NEEDLE THUMBSCREW CAN USE STANDARD WALKING FOOT NO ADAPTERS NEEDED!