Panties Sewn on Kenmore 1914 Sewing Machine
TO BE CONTINUED...
Last update- February 16, 2024
 |
| Third pair of little girl panties from pink shirt. |
I know a lot of people want to sew knits on vintage Kenmore (or other vint age brands) sewing machines, and have a lot of problems doing so. As a result, I am sewing knit panties, some from new fabric, some from old tshirts, on some of my vintage sewing machines.
I made 5 pair of little girl panties (for my 4 year old granddaughter), and 3 pair of ladies panties, with different fabrics, from new fabric, to old tshirts. A long sleeved tshirt of 100% cotton rib knit, turned into 3 pair panties for a 4 year old, and 2 pair for me.
 |
| One version of little girl panties, with a decorative flat lace elastic |
 |
| One version of the little girl panties, sew completely on the Kenmore 1914 zigzag sewing machine, using zigzag, at 2, and 10 to 12 stitches per inch, and lowering presser foot pressure to 1, and lowered tension slightly, on upper thread. I used multi stitch zigzag to apply the elastic and to fold the elastic and seams flat, after I zigzagged the seams. |
The softer the fabric, the more difficult it is to sew on a zigzag sewing machine. It is harder to sew knits on a sewing machine, and slower, than on a serger, but you CAN do it, with patience, and practice.
2 way stretch knits are easier to sew on a sewing machine, than super flexible 4 way knits, but the more you practice, the better you get. The way you hold, and feed the fabric, often determines whether you get skipped stitches.

 |
| Top pair from side panels of a tshirt Pink pair with lace, one of 5 pair of panties from a super soft long sleeved women's tshirt 2 large women's and 3 pair 4 year old girl panties. I had to piece back, using side panels, and added lace. |
TIP- use scraps of the same fabric, to test stitches before sewing on your project, this is how to choose what stitches work best.
I will be adding more to this blog post, as I sew more, hopefully adding more information.
 |
| Front view of panties from tshirt I chose to NOT fold over, the foldover elastic, at the waistband. I used 1/4" braided elastic in the legs, zigzagged on, then folded over to the inside, and zigzagged it down. |
 |
| Back view panties sewn from a tshirt Funny details, the tshirt was a cancer survivors support tshirt, so sponsors of the fundraiser, have their names on the shirt. If you zoom in, these say "Cooks Rentals", so I guess I made rental panties, LOL! (Several other supporters are also on the right hip, real support panties, LOL! |
 |
| I was able to cut out 2 pair of 1X women's panties, and 2 pair of 4 year old girl panties out of this super soft 100% cotton rib knit long sleeved tshirt. I did have to piece the front on the the second pair of women's panties. I use the small scraps to test sew different stitches and techniques, before sewing the project, the panties. |
 |
| I prefer to trace my pattern pieces on the fabric, before cutting them out. Tailor's chalk works well with this method, whether you use the hard flat chalk, or the chalk wheel notion. In a pinch, a pen or pencil can be used, but you would need to draw the lines outsede the seam lines, to avoid permanent markings. There are other marking methods, air disappearing marker, and heat disappearing pens, tracing wheels and tracing chalked paper, for example. |

TIPS-
1. NEEDLES - MOST IMPORTANT TIP-
If you are getting skipped stitches, or holes in your fabric, using your universal tip needles, switch to
ballpoint (SES)
jersey (SUK), (Schmetz stretch 130/705 H-S SUK for elastic materials and highly elastic knitwear)
Super Stretch (SP) needles, according to your fabric type.
If you still get skipped stitches, try a smaller needle size, like 10 or 11 for fine knits, or a different knit needle tip type. (I highly recommend reading Schmetz needle information on the Schmetz needle website, learn why different needles work better with various fabrics.)
 |
| Schmetz STRETCH 130/705 H-S size 75/11 Kenmore stretch size 14 Schmetz 130 SES size70/10 |
2. Lower presser foot pressure, to help knits feed better. Otherwise, they can get trapped in the feed dogs, especially super soft, stretchy knits.
3. Stabilizers, paper, or just using plain old starch, either under fabric, or on top of fabric, can help with super soft, thin fabrics stitch and feed better. The less stable the fabric, the more likely using a stabilizer can help.
4. PRESSER FEET- Not everyone has extra presser feet available, so I sewed these with the Kenmore A standard zigzag presser foot. If you have one, a Q foot, a walking foot, a roller foot (must have wide enough zigzag opening), or even a satin stitch foot, or clear satin stitch foot, or a Teflon foot, could be used, if you have problem using the standard A presser foot.
5. Start stitching approximately 1/4" in from fabric edge, to avoid having fabric and thread jams. Basically, fabric needs supported by the presser foot, and needleplate, in order to feed best.
CLIPS work better than pins, sometimes!
 |
| Clips work better than pins, sometimes! |
Panty patterns are available online, or at your fabric store, some are even free to download and print out. You can also simply trace your favorite panties, front, back, and crotch panel. You need 2 crotch panels, 1 must be cotton.
Here is a YouTube video I found on drafting panties from your measurements
Drafting panties from measurements
This next YouTube video I found, shows how to copy your favorite panties, to draft a pattern, and what order to sew them.
Copy and sew your favorite panties
 |
| Super soft 100% cotton pink rib knit, from a long sleeve shirt, feels like the softest cashmere. Very difficult to sew, due to the fabric sticking to the needle, despite using the right knit needle, dipping the needle in needle and thread lubricant, I used tear away, wash away stabilizer, to do some of the leg band stitching, but wound up taking a break, and sewing without stabilizer, that it worked best, holding fabric gently taut, both in front of, and behind the presser foot and needle, allowing feed dogs to move fabric. |
PANTY PATTERNS
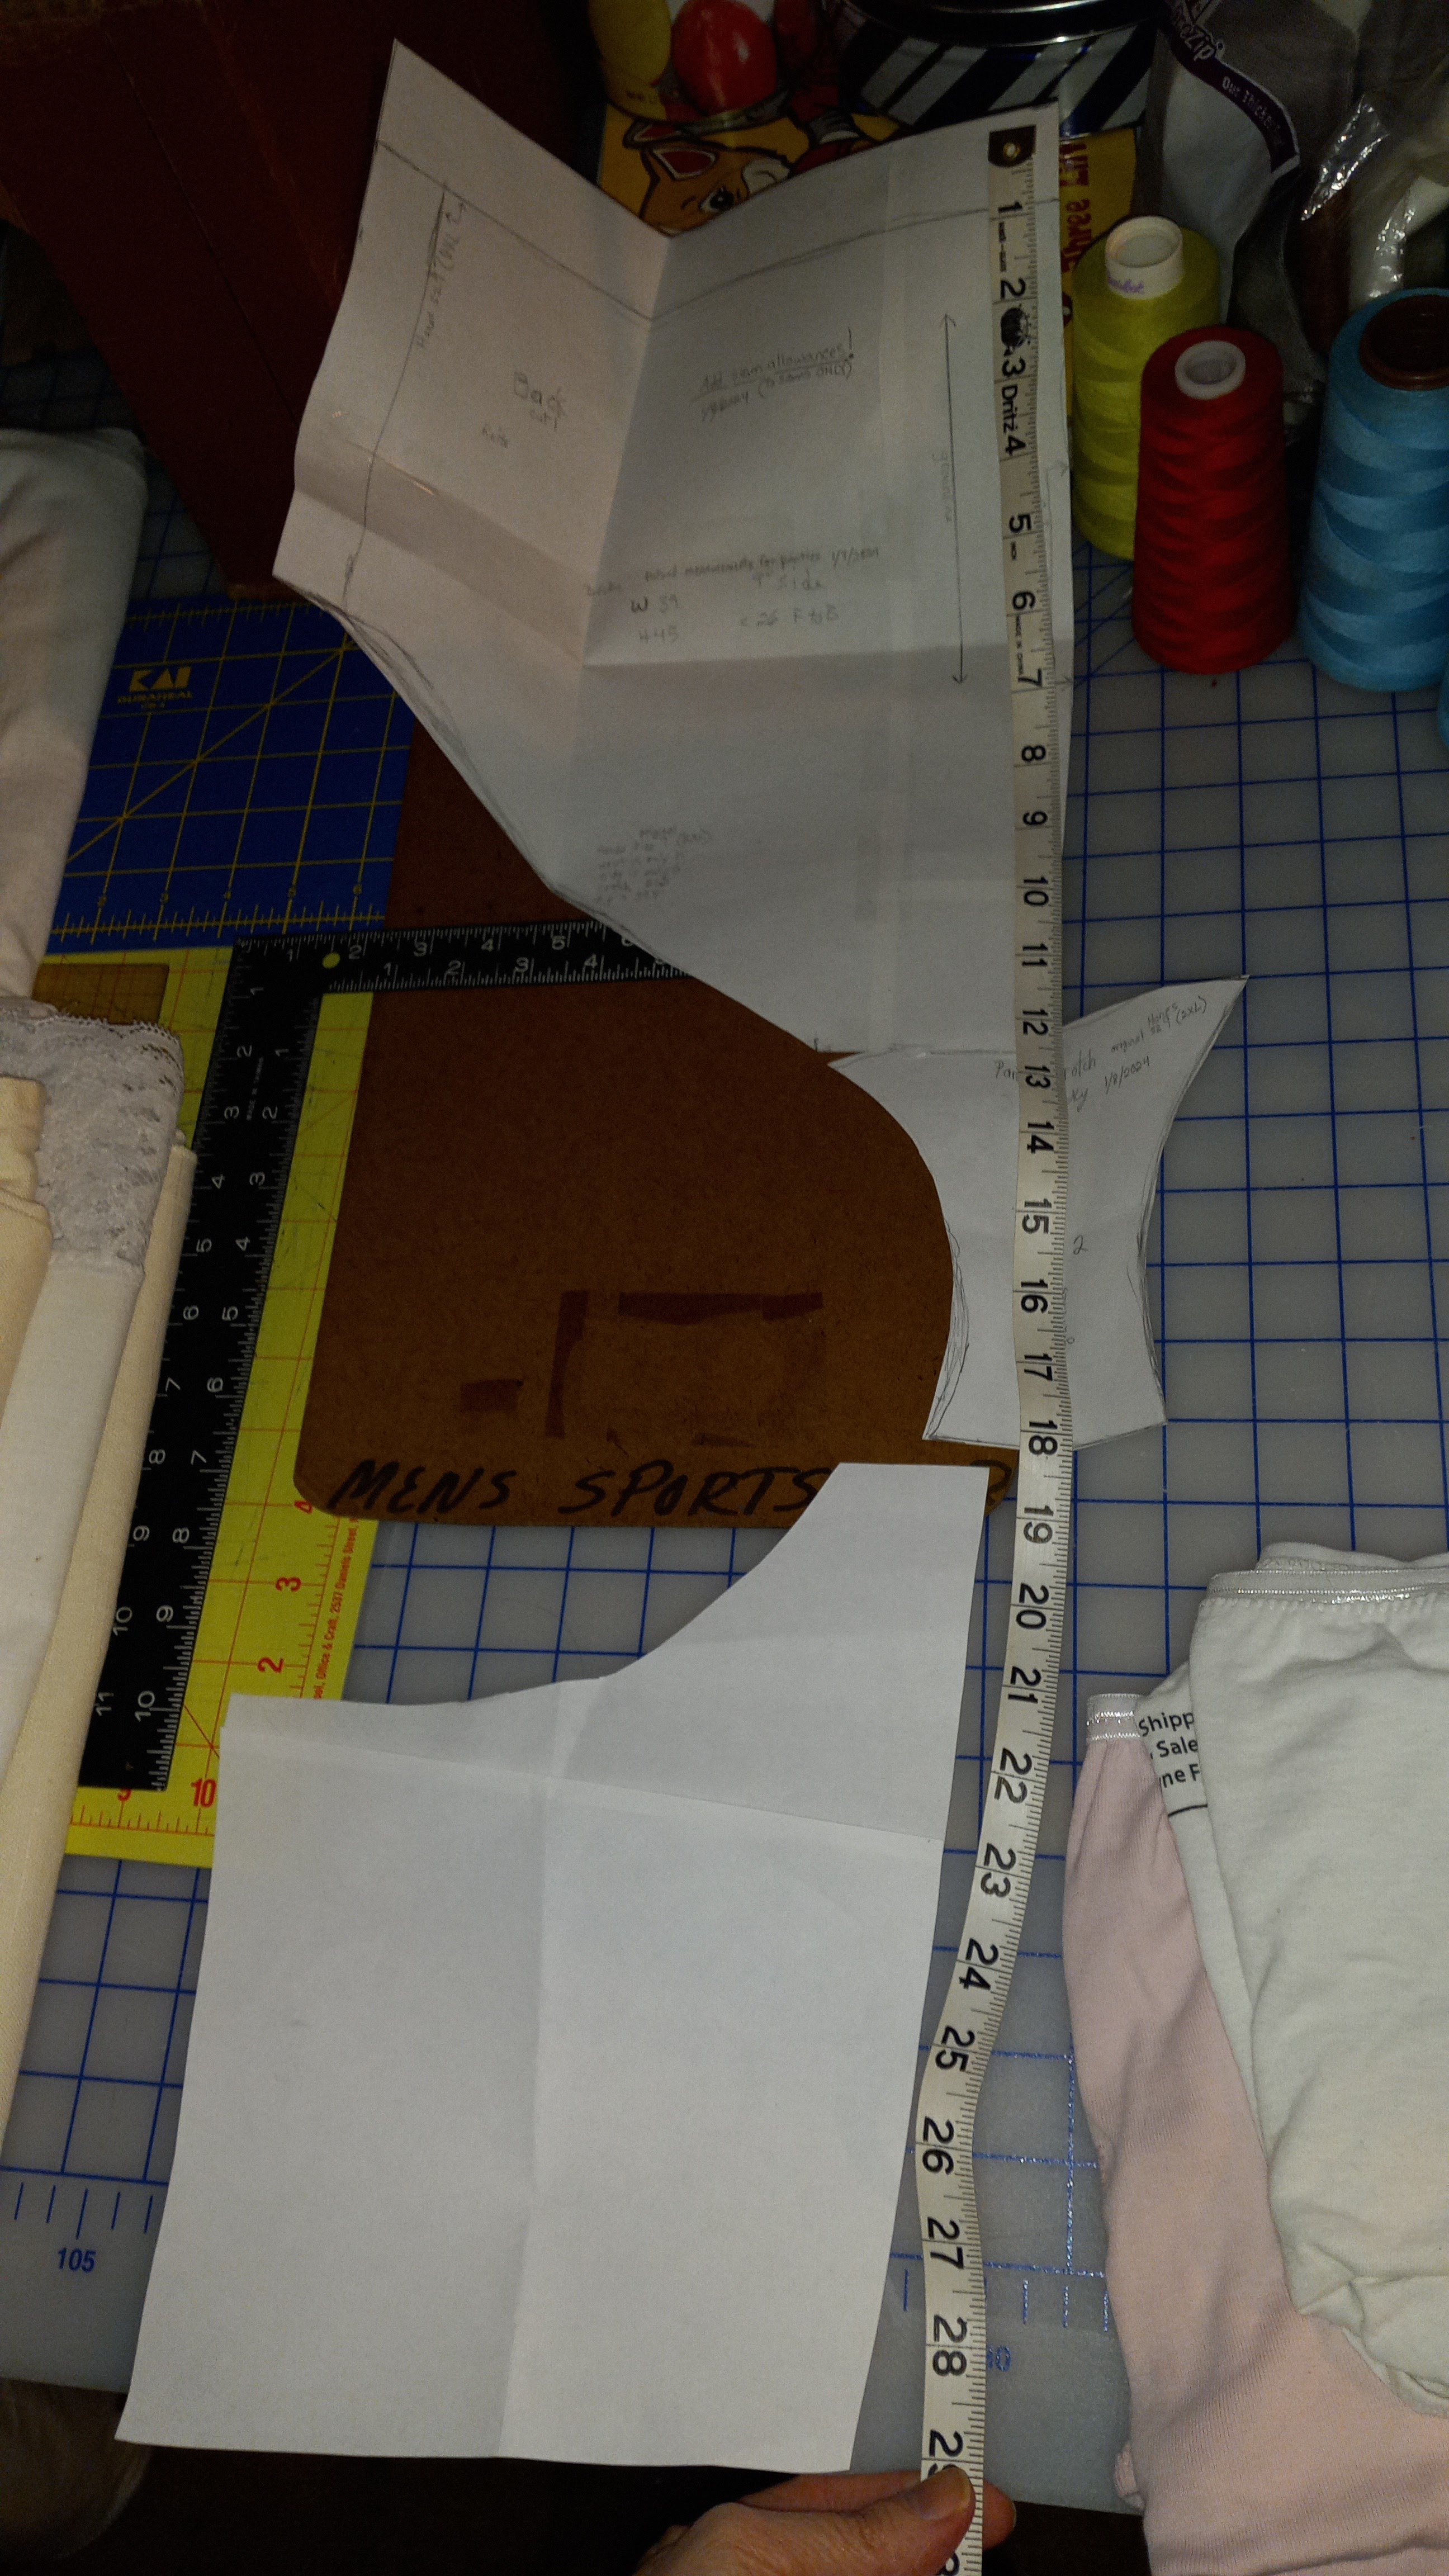
There are many free panty patterns available online, but I wanted panties like I used to buy from Hanes, but their new panties are cheaply made, from thin, not as comfortable fabric, and the size I thought would fit me, just isn't comfortable, so I took notes of what their original fit and measurements were, wrote them on the paper I was drawing my pattern, took my own measurements, then drew my pattern on legal sized copy papers, taped together, to make large enough pattern pieces.
PANTY PATTERN MEASUREMENTS
Take your measurements, while wearing just your panties, to get correct measurements. Measuring while wearing other clothing would make your pattern too big.
 |
| Panty measurements to draw panties |
A.Waist circumference
B. Hip circumference
C. Crotch from center front to center back
D. Crotch width
E. Crotch panel length
F. Leg opening (circumference)
G. Hip side seam depth from panty leg opening to waist (sit to measure from leg fold up to waist)
H. Distance from center back/front for side seam position.
Decide where you want side seam to be, halfway may work for some people, but if you have a large bum, like me, moving the side seam forward, is more comfortable, so my back pattern piece is wider than my front pattern piece.
If you have a flat backside, and large tummy, you may prefer side seams further back, so your front pattern piece would be wider than your back pattern piece.
 |
| FINAL PATTERN MEASUREMENTS FOR MY PATTERN. Notice I show original measurements for a pair of Hanes panties size 9 (2XL) Notice how different that is compared to what I made for myself, to fit my measurements, and preference for fit. (UPDATED since previous photo below, of the back panty pattern piece. |
 |
| My panty back pattern, I need more coverage on the back, since I have a good size bum, and big hips, so I drew an angled line, with a bit of a wave, down into the leg opening, to give me a bit more bun coverage. |
 |
| I compared the Hanes panty to my pattern, drawing the Hanes side seam, so you can see where their seam would be, compared to where I wanted my seams. I wanted higher cut fronts on my panty leg opening. |
 |
| Measurement from center front, through crotch, to the center back, needs to be long enough to cover your crotch depth measurement, unless you want your panties to be slightly shorter in the crotch. |
I HIGHLY RECCOMMEND The Singer Sewing Reference Library book called "Sewing Lingerie"!
 |
| SEWING LINGERIE SINGER'S SEWING REFERENCE LIBRARY |
 |
| Great step by step photos! |
 |
| Great techniques and instructions! |
 |
| More step by step photos and instructions, for sewing machines and sergers |
 |
| Pink panties foldover elastic sewn FLAT (I didn't want narrow elastic, so I sewed the soft side towards the inside of the panties, used a multi stitch zigzag on vintage Kenmore model 1914 sewing machine 158.19142 |
 |
| Pink panties showing detail of joined elastic by straight stitchin it to a piece of 3/8" wide white ribbon, then folded ribbon over joined elastic, and sewed a box shape using straight stitch. Multistitch zigzag stitch to attach elastic flat. |
 |
| Pink panty leg openings bound with a strip of the same fabric, cut to 80% the measurement of the leg opening. I joined the ends first, then quarter marked each leg opening, and each joined binding circle, right sides together, zigzagged them to leg openings, matching quarter markings. Then I folded them around the edge, making a binding, and zigzagged it flat. Then, using applique scissors, trimmed the excess binding on the inside, close to the stitching. |
 |
| Place one crotch piece right side up, then match the back panty piece right side down, over it, then the back of the lining, wrong side to the wrong side of the back piece, and clip or pin them in place, then zigzag the back crotch seam, using 1/4" seam width, zigzag width of 1.5 or 2 mm. |

 |
| Roll up the back of the panties, fold the right sides of the crotch pieces over the rolled back piece, roll up the front piece, leaving the front crotch seam area to match between the crotch front seams, clip or pin in place, then zigzag just like you did the back seam. To turn right side out, pull one side of the front and back panel, through the opening beween the sewn crotch panels. |
 |
| Trim any corners which extend beyond the leg edge, so you have a smooth curve to attach your elastic lace. |
 |
| To attach the leg and waist elastic, use a multi stitch zigzag stitch, 2 mm wide, 10 or 12 stitches to the inch, lengthwise, overlapping the elastic lace at least halfway over the fabric edge. I kept a slight tension on the elastic, to be sure it wasn't too long, and enough elastic to overlap 1/2" at the seams, so you have something to hold onto, while you stitch. |
 |
| Overlapping the edge with the elastic lace, if necessary, while stitching elastic |


 |
| Wrong side view of panties, after sewing on the elastic lace |
 |
| Stitching on waistband elastic lace, I sewed the front and back elastic lace on separately, so I could sew the side seams flat, then open them, and stitch the elastic at top and bottom side seams, open flat. |

 |
| Side seams sewn with 1/4" seam width, zigzag stitch width 2, length 10 to 12 stitches per inch. |

 |
| Trim excess elastic at side seams, after side seams are zigzagged |
 |
| Preparing to multistitch zigzag over the flattened seam and elastic, at top and bottom of side seams. |
 |
| Detail of seams girl panties |
 |
| Right side view of side seam, after opening zigzag seam flat, and sewing a multi stitch zigzag stitch, width of 4, stitch length 12 stitches per inch, over the flattened open seams, at top and bottom of side seams. This holds the elastic joining seam flat, as well. |
 |
| The 4th version of 4 year old girl panties |
 |
| 4th version of 4 year old girl panties |
I have tried different feet, needles, stitches, and settings, on different days, using the same fabric, to sew the different versions of panties.
February 9th 2024 settings, more little girl panties, and another pair of women' panties, that I added lace.
 |
| I did still get skipped stitches, ironically, resewing in the same area, skipped stitches, a second, sometimes a third time, in exactly the same area, so there may be a fabric finish in this area, which causes skipped stitches. This is fabric upcycled from a long sleeved tshirt. |
 |
| Using the burrito method again, to sew crotch seams, roll fro t and back panty pieces inside the crotch pieces, then pull them out one side, you will have enclosed seams. |
 |
| February 9th, I used the Q foot, a Schmetz size 75/11 stretch needle, presser foot pressure lowered to 1, upper tension 1 1/2, zigzag stitch, stitch width 2, stitch length 11 stitches per inch |
 |
| Adding lace to the front panel |
 |
| Lace panel between seams |
 |
| Sewing lace down, zigzag over the scalloped edge |

 |
| My fabric has a tiny hole, so I hid it behind the lace panel |
 |
| Showing the hidden hole, behind the lace |
 |
| Joining elastic, butted together, straight stitch, 12 stitches per inch, over satin ribbon, then fold satin up over the stitches, then fold the top strip of satin over it, straight stitch a box, over the top, trim satin. |
 |
| Stitch detail |
 |
| Waistband elastic, and leg elastic joined with ribbon, ready to stitch in the round method. |


