Ruffles learn to gather and shirr fabric quickly, with a sewing machine
RUFFLES FAST! A shirring foot is an EXCELLENT way to sew ruffles, very quickly! Shirring feet are available for both home sewing machines and industrial sewing machines, though they may look a little different. This is for ruffling a single layer of lightweight fabric, on a sewing machine.
Video shows using a shirring foot on an industrial Singer 660 1A sewing machine. Your home sewing machine can use a shirring foot, too. These work best on lightweight fabrics, you need a different technique for medium weight fabrics, and really should do tucks, rather than gathers, on heavyweight fabrics, if you desire ruffles.
SHIRRING FOOT VIDEO
FASTEST WAYS TO GATHER LIGHTWEIGHT FABRIC
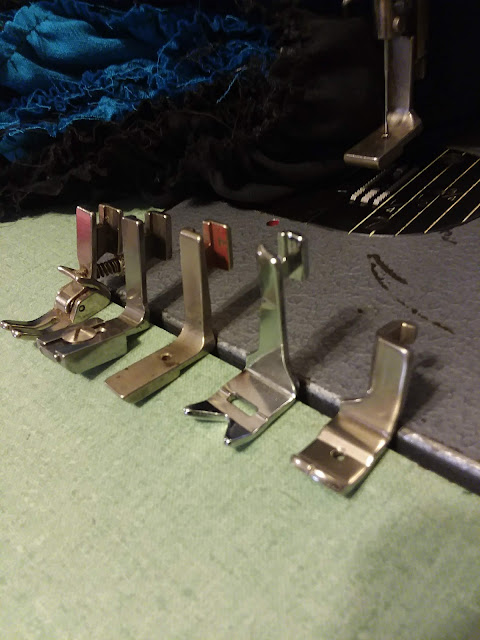
Shirring Feet- Shirring feet usually have either a hump, in the bottom of the presser foot, or a thick part at the front of the foot, and look almost like they are missing a heel, at the back. This is what allows the feed dogs to gather the fabric, when you set the stitch length and tension properly for gathering.
Set stitch length on the longest stitch length (I accidentally said shortest, at first, in the video, but did correct myself), usually around 6 stitches per inch, and tighten your upper tension, to create the amount of gathers you need. YOU control this, the best way to prepare, is to test on fabric scraps, before gathering ruffles on your project.
TIP- remember to reset your tension, and stitch length when you are finished gathering ruffles, before beginning sewing seams.
 |
| Same high shank industrial shirring feet, another view |
 |
| High shank industrial shirring feet, 3 variations |
2 layer shirring feet- Can sew and shirr the bottom layer, at the same time, I only have one in the photo, at the lower front of the photo
Rufflers - make sure you use a ruffler for the type of needle homing position that your machine is designed for.
Most rufflers can both gather a lower layer of fabric, and stitch it to the flat project fabric, at the same time. They even have guides to add ribbon or lace, while doing all of this, in one step! It takes practice, and following the instructions that come with your sewing machine, and ruffler, to achieve this successfully, but it does work, if done correctly. There are a variety of settings on your ruffler, you change the amount of "tucks" (gathers), by setting the prong at the front of the ruffler, into a different hole, settings are star (no ruffles), gather every 1 stitch, every 6 stitches, or every 12 stitches. You can adjust fuller gathers, or less full gathers, by adjusting a dial or lever on the side, or screw on top, of other rufflers.
 |
| Top left Griest low shank ruffler for Kenmore center homing needle machine, top right low shank Griest ruffler, Lower left, Singer low shank ruffler, lower right, Griest high shank ruffler for Necchi |
You can also simply sew a basting stitch, usually 2 or 3 parallel rows, between the seam line and the edge of the fabric, where you want the gathers, works here. Do NOT cut the tails on your threads, you use them to pull, to create the gathers, after you have sewn the number of rows of basting stitches, which you want.
Another way of gathering lightweight fabric, at your sewing machine, is to pull your needle and bobbin thread out from the machine, the length of the fabric width, that you want to gather. Twist the two threads together, and pull them to the front of your machine, straight in front of the presser foot. Put your needle down in the fabric, and lower the presser foot. Make sure stitch length is set for the longest stitch length (approximately 6 stitches per inch works best), then backstitch at the beginning of where you want to gather. Set stitch WIDTH to widest stitch setting, at least 4 mm. Holding the twisted thread in front of the presser foot, begin to zigzag over the twisted thread, making sure not to catch the thread, in your stitches. When you get to the end of the fabric, pull the threads, they shouldn't break, because there are two, twisted together for strength, and you will be able to adjust the gathers to your own liking!
Medium weight fabric gathering, zigzag over cording
 |
| GROOVES and GUIDES in the bottom of the presser feet, are what make these good presser feet for zigzagging over cording |
Zigzagging over a cord, or elastic, is the best way to gather medium weight fabrics.
Best feet for gathering medium weight fabrics, using a cord, or elastic cord- you zigzag over the cords, but do NOT stitch through the cords, or you won't be able to gather your fabric.
buttonhole presser foot (two grooves are perfect for the cord, so you zigzag over them)
pintuck foot (guide cord into the 2 center grooves and zigzag over them)
Satin stitch embroidery foot (guide cord into channel, and zigzag over it great for 1/8" elastic)
cording foot (guide cords through foot cord guides, and zigzag over them.
 |
| Shirring by zigzagging over elastic, using a clear satin stitch embroidery presser foot |
 |
| Shirring by zigzagging over elastic, using a clear satin stitch embroidery presser foot |
Heavy weight fabric gathering
There aren't a lot of times when you want to gather heavy fabrics, unless you are doing draperies, but tucks are the best way to sew gathers in heavier fabrics. You often wind up creating the tucks by hand, pinning them, and then sewing them, to help them hold. There are special drapery tapes, which are specially made to iron onto, and or sew onto draperies, which already have a cord in the tapes, which you then pull, and it forms the pleats or tucks into the drapes, for the gathered effect.


